
Setting up a proxy server can enhance your internet security, provide anonymity, and potentially improve connection speeds. A proxy server acts as an intermediary between your computer and the internet, helping to hide your IP address and ensuring a more secure connection. In this article, we will provide a detailed guide on how to set up a proxy server on the Windows 7 operating system. Additionally, we will explore alternative methods for configuring a proxy and determine which method is the simplest and most convenient.
How to Set Up a Proxy in Windows 7
Contents
- How to Set Up a Proxy in Windows 7
- Step 1: Open the Control Panel
- Step 2: Navigate to Internet Options
- Step 3: Open the Connections Tab
- Step 4: Access LAN Settings
- Step 5: Configure Proxy Settings
- Step 6: Enter the Proxy Server Address and Port
- Step 7: Bypass Proxy Server for Local Addresses
- Step 8: Advanced Proxy Settings (Optional)
- Step 9: Save and Apply Settings
- Step 10: Test Your Proxy Connection
- Alternative Methods for Configuring a Proxy on Windows 7
Before you can start setting up, you must have a proxy server. If you don’t have one, use Proxy5.net, which provides easily customizable and high-quality proxy servers that are ideal for Windows 7.
Step 1: Open the Control Panel
To begin configuring a proxy server in Windows 7, first, open the Control Panel. You can do this by clicking on the Start menu and selecting “Control Panel” from the right-hand side of the menu.
Once you are in the Control Panel, look for the “Network and Internet” category and click on it. From there, select “Internet Options.”
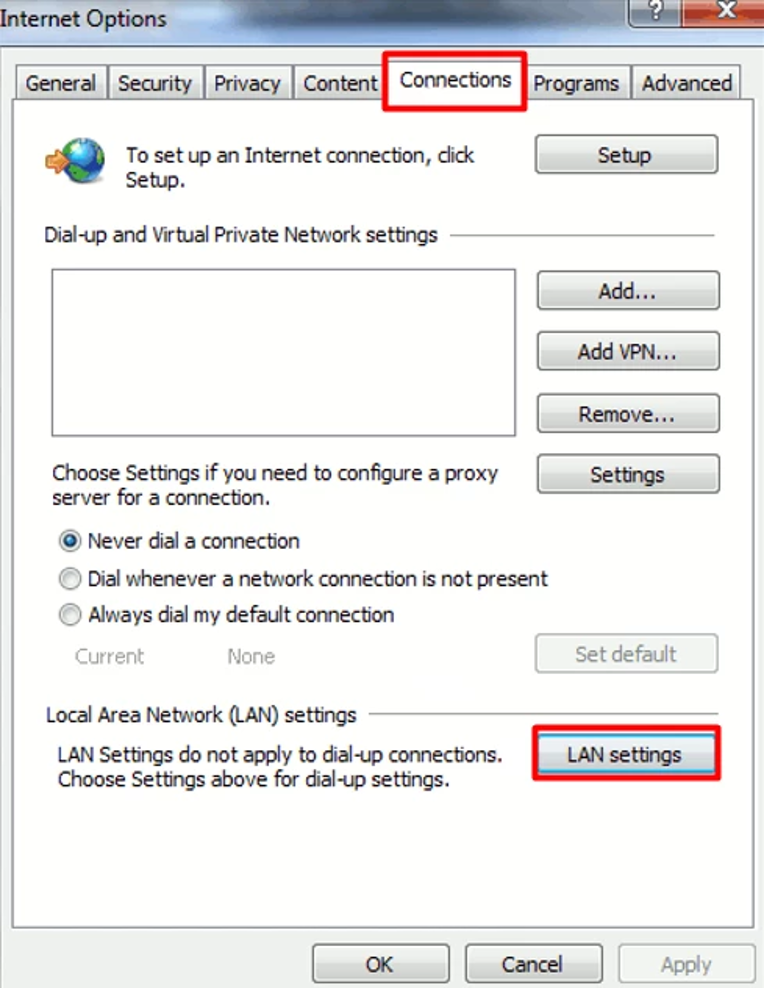
Step 3: Open the Connections Tab
In the Internet Options window, click on the “Connections” tab. This tab contains settings related to your internet connection, including proxy settings.
Step 4: Access LAN Settings
Under the “Connections” tab, you will see a button labeled “LAN settings.” Click on this button to open the Local Area Network (LAN) Settings window.
Step 5: Configure Proxy Settings
In the LAN Settings window, you will find a section labeled “Proxy server.” Check the box that says “Use a proxy server for your LAN.” This will enable the fields where you can enter your proxy server’s address and port number.
Step 6: Enter the Proxy Server Address and Port
In the appropriate fields, enter the address and port number of the proxy server you wish to use. Ensure that you have the correct details from your proxy service provider. For example, if your proxy server address is “192.168.1.1” and the port number is “8080,” you would enter these values in the respective fields.
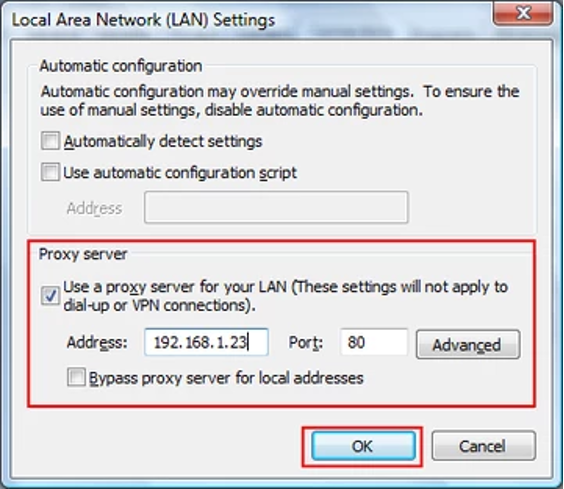
Step 7: Bypass Proxy Server for Local Addresses
To prevent the proxy server from being used for local addresses, check the box labeled “Bypass proxy server for local addresses.” This can improve performance for local network traffic.
Step 8: Advanced Proxy Settings (Optional)
If you need to configure advanced proxy settings, such as different proxies for different protocols (HTTP, HTTPS, FTP), click on the “Advanced” button. Here, you can specify individual proxy servers for each protocol.
Step 9: Save and Apply Settings
Once you have entered all the necessary information, click “OK” to save your settings. Then, click “OK” again in the Internet Options window to apply the changes.
Step 10: Test Your Proxy Connection
To ensure that your proxy server is working correctly, open your web browser and try to access a website. If configured correctly, your internet traffic should now be routed through the proxy server.
Alternative Methods for Configuring a Proxy on Windows 7
There are several other methods to configure a proxy server on Windows 7, each with its own advantages. Here, we list five alternative methods:
- Using Browser Settings Many web browsers, such as Google Chrome and Mozilla Firefox, allow you to configure proxy settings directly within the browser. This method is useful if you want to use a proxy server only for web browsing and not for other internet activities.
- Using Proxy Software Several third-party software applications can help you manage proxy settings more easily. Programs like Proxifier and ProxyCap allow for more advanced proxy configurations and can route specific applications through the proxy server.
- Using Command Prompt Advanced users can configure proxy settings using the Command Prompt. This method involves running specific commands to set the proxy server address and port. For example, the command
- netsh winhttp set proxy proxy-server=”http=proxyaddress:port”
- can be used to configure the proxy.
- Using Group Policy Editor In a corporate environment, network administrators can use the Group Policy Editor to configure proxy settings for multiple computers. This method allows for centralized management and enforcement of proxy settings.
- Using VPN with Built-in Proxy Some VPN services include built-in proxy features. By configuring your VPN client to use the proxy, you can benefit from both VPN encryption and the proxy server’s anonymity. This method is particularly useful for users who prioritize security and privacy.
In conclusion, configuring a proxy server on Windows 7 can significantly enhance your internet experience by providing added security, anonymity, and potentially faster connection speeds. While the step-by-step method through the Control Panel is straightforward and effective, alternative methods such as using browser settings, proxy software, command prompt, group policy editor, and VPN with built-in proxy offer additional flexibility and functionality. For most users, the Control Panel method is likely the simplest and most convenient option. However, depending on your specific needs, one of the alternative methods may be more suitable. By understanding and utilizing these various methods, you can effectively manage your internet connections and enjoy a safer, more private online experience.